Categories
//Create PKI Certificate for Linux Server
Create PKI Certificate for Linux Server

Using OpenSSL we learn how to create a Certificate Request from Linux node, to issue a certificate from a Windows PKI Server
At some point, you will have the requirement of creating a certificate request, and submitting this to an online certificate authority, which will process the request and issue you a certificate with both a Public and Private Key.
In this post, we will use the ‘OpenSSL’ utility to create such a request file, and walk trough the steps of issuing a certificate from a Windows PKI Server.
Creating our Certificate Request
We will create a Certificate Request template file which defines the settings which are necessary to also include Subject Alternate Name in the issued certificate.
The request file we create can be named as you wish, I will be using ~/san.cnf
[ req ]
default_bits = 2048
distinguished_name = req_distinguished_name
req_extensions = req_ext
[ req_distinguished_name ]
countryName = Country Name (2 letter code)
stateOrProvinceName = State or Province Name (full name)
localityName = Locality Name (eg, city)
organizationName = Organization Name (eg, company)
commonName = Common Name (e.g. server FQDN or YOUR name)
[ req_ext ]
subjectAltName = @alt_names
[alt_names]
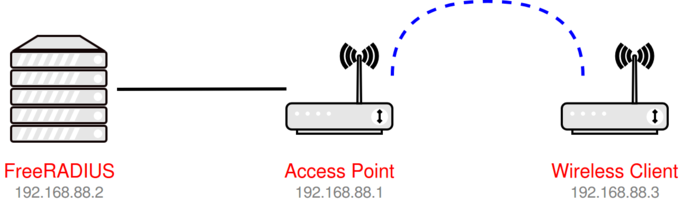
DNS.1 = radius.diginerve.ie
The above is a working template - the only changes you should make to this file is the atl_names at the bottom, where these should represent the name you wish to have the certificate issued on behalf of; In my example this is radius.diginerve.ie
Create the Private Key
From the computer you are wishing to create the certificate for (for example a Linux FreeRadius server), we will generate the request for private key using the template as follows.
Note, that the OpenSSL tool will ask some additional questions during execution, and once complete will create two new files
- Private Key for the Servers Certificate
server.key - Certificate Request for the Server
server.csr
openssl req -newkey rsa:2048 -nodes -keyout server.key -out server.csr -config san.cnf


Generating a RSA private key
............................+++++
........................................................+++++
writing new private key to 'server.pem'
-----
You are about to be asked to enter information that will be incorporated
into your certificate request.
What you are about to enter is what is called a Distinguished Name or a DN.
There are quite a few fields but you can leave some blank
For some fields there will be a default value,
If you enter '.', the field will be left blank.
-----
Country Name (2 letter code) [AU]:ie
State or Province Name (full name) [Some-State]:Mayo
Locality Name (eg, city) []:Ballina
Organization Name (eg, company) [Internet Widgits Pty Ltd]:DigiNerve
Organizational Unit Name (eg, section) []:IT
Common Name (e.g. server FQDN or YOUR name) []:radius.diginerve.ie
Email Address []:support@diginerve.ie
Validate the Request File
Before we take the Certificate to the PKI server to issue the certificate for the server, we can double check the request t ensure that the SAN is included as per the Template.
openssl x509 -in server.crt -text -noout
This command will read in the new certificate request file, and dump its content in a readable text format so we can validate the request is correct.
Present the Certificate Request to Windows PKI
In this example, I will follow the process of using a PKI Certificate Authority running from Windows PKI configuration, Therefor we need to follow the following steps on the windows host
server.csr is the certificate request. Copy this file to the computer where you CA is.
Check the Windows PKI Server Templates
Look for a web server or server template on the Issuing CA
certutil -CATemplates


IPSECIntermediateOffline: IPSec (Offline request) -- Auto-Enroll: Access is denied.
CEPEncryption: CEP Encryption -- Auto-Enroll: Access is denied.
EnrollmentAgentOffline: Exchange Enrollment Agent (Offline request) -- Auto-Enroll: Access is denied.
Administrator: Administrator -- Auto-Enroll: Access is denied.
WebServer: Web Server -- Auto-Enroll: Access is denied.


CertUtil: -CATemplates command completed successfully.
Now, from the list of offered Certificate templates, select one which will include the ‘Server Authentication’ OID; in this example I will use ‘Web Server’ in the request the certificate
certreq.exe -attrib "CertificateTemplate:Web Server" server.csr
A window will popup asking you to select the CA where your request is to be submitted to. Select the one that you wish to use.
Next a dialog will pop up asking for where to save the new certificate. give a filename (let’s call it server) and finish the wizard. This will give you a file server.cer.
Copy this file to your FreeRadius server in /etc/freeradius/certs
Optional - Manually Adding the OID to the Certificate Request
This is only appropriate or required if the Template used does not include the Server Authentication OID
When generating certificates for use by FreeRadius EAP-TLS, This has two requirements so that the service will successfully validate the certificate.
- Include the “Server Authentication” (OID 1.3.6.1.5.5.7.3.1)
- Include a Subject Alternate Name
802.1x
When a client uses PEAP-EAP-MS-Challenge Handshake Authentication Protocol (CHAP) version 2 authentication, PEAP with EAP-TLS authentication, or EAP-TLS authentication, Microsoft specifies that certificates must have the “Enhanced Key Usage” attribute with the value “Server Authentication” (OID 1.3.6.1.5.5.7.3.1). [Ref.: http://support.microsoft.com/kb/814394/en-us ]
If these extension are not present in your FreeRadius certificate, the auth process will fail, because the client will stop communicating with your server due that it can’t validate your cert.
Since the certificate request generated in openssl according to the procedure above does not provide this attribute, it is necessary to add it to the pending request with the Windows CLI command “certutil”.
The general syntax is certutil -setextension RequestID ExtensionOID Flags @InFile
- The ExtensionOID for the attribute “Enhanced Key Usage” is 2.5.29.37
- The flags value is set to 0.
- For the @InFile, we will create an input text file
eku.txtas followsecho 30 0a 06 08 2b 06 01 05 05 07 03 01 > eku.txt
Now, with all the information required, we can run the following command
certutil -setextension RequestID 2.5.29.37 0 @eku.txt
Once the command has completed, launch the Windows Certification Authority application and
-
Open “Pending request”
-
Right click on the request we just modified (RequestID)
-
Select “All tasks” -> “Issue”
-
Go to “Issued certificates” and double-click on the one you just issued (RequestID).
A window will open displaying cert’s info. Go to the tab “Details” and check that the field “Enhanced Key Usage” is present and its value is “Server Authentication (1.3.6.1.5.5.7.3.1)”.
- Click on the button “Copy to file…” and save it as either DER encoded or Base-64 encoded, give a filename (let’s call it
server) and finish the wizard. This will give you a fileserver.cer.
- Click on the button “Copy to file…” and save it as either DER encoded or Base-64 encoded, give a filename (let’s call it
Copy this file to your FreeRadius server in /etc/freeradius/certs
Verify the Servers Certificate
Back on our Linux node, with a copy of our new certificate on hand server.cer, we can now check that the certificate matches all the requirements we outlined at the beginning of this process
- Include the Servers Common name, eg radius.diginerve.ie
- Include the “Server Authentication” (OID 1.3.6.1.5.5.7.3.1)
- Include a Subject Alternate Name
Using OpenSSL can view the certificate
root@p-nps-radius01:/etc/freeradius/certs# openssl x509 -in server.pem -text -noout
Certificate:
    Data:
        Version: 3 (0x2)
        Serial Number:
            51:~~~~:33
        Signature Algorithm: sha256WithRSAEncryption
        Issuer: DC = IE, DC = diginerve, DC = ie, CN = MY Domain CA Issuer
        Validity
            Not Before: Apr  7 11:34:18 2021 GMT
            Not After : Feb  1 12:16:46 2022 GMT
        Subject: C = IE, ST = Mayo, L = Ballina, O = MIS, CN = radius.diginerve.ie
        Subject Public Key Info:
            Public Key Algorithm: rsaEncryption
                RSA Public-Key: (2048 bit)
                Modulus:
                    00:d0:6d:0d:14:5b:01:a9:4a:8a:ec:51:84:5b:6c:
                    ~~~~~~~~~~~~~~~~~~~~~~~~~~~~~~~~~~~~~~~~~~~~~
                    53:87:86:a5:47:f0:81:e6:85:06:c6:96:10:ed:68:
                    31:9d
                Exponent: 65537 (0x10001)
        X509v3 extensions:
            X509v3 Subject Alternative Name:
                DNS:radius.diginerve.ie
            X509v3 Subject Key Identifier:
                43:35:46:D4:ED:00:89:83:F2:73:B5:6B:51:15:BB:B6:AE:7D:49:8E
            X509v3 Authority Key Identifier:
                keyid:0C:21:7E:6B:1D:D6:93:BB:17:7A:55:53:88:CD:5F:5F:64:A3:83:0E

            X509v3 CRL Distribution Points:

                Full Name:
                  URI:ldap:///CN=My%20Issuer,CN=p-ie1ca-ca01,CN=CDP,CN=Public%20Key%20Services,CN=Services,CN=Configuration,DC=pki,DC=diginerve,DC=ie?certificateRevocationList?base?objectClass=cRLDistributionPoint

            Authority Information Access:
                CA Issuers - URI:ldap:///CN=My%20Issuer,CN=AIA,CN=Public%20Key%20Services,CN=Services,CN=Configuration,DC=pki,DC=diginerve,DC=ie?cACertificate?base?objectClass=certificationAuthority

            X509v3 Key Usage: critical
                Digital Signature, Key Encipherment
            1.3.6.1.4.1.311.21.7:
                0..&+.....7.....j...#...........,&...?......d...
            X509v3 Extended Key Usage:
                TLS Web Server Authentication
            1.3.6.1.4.1.311.21.10:
                0.0
..+.......
    Signature Algorithm: sha256WithRSAEncryption
         ab:7f:d6:12:80:f7:fe:d6:d9:44:f8:1a:fc:fb:91:2d:eb:05:
         ~~~~~~~~~~~~~~~~~~~~~~~~~~~~~~~~~~~~~~~~~~~~~~~~~~~~~~
         b1:f2:ae:a5
Search for the following to be present and correct
- Subject: and check it,
- Next, Locate the X509v3 Subject Alternative Name: and ensure it exists and is correct,
- Finally, X509v3 Extended Key Usage should contain TLS Web Server Authentication 1.3.6.1.4.1.311.21.10
DER Encoded Certificate
If the certificate is not in Base64, We need to convert this file to a format FreeRadius can understand. So, now type:
openssl x509 -inform DER -in server.cer -outform PEM -out server.pem

01. About Author
Damian Flynn
I define myself as an evangelist; an entrepreneur & author with an ideology rooted in business insights, technology exploration, pattern analysis and high energy. I envision, theorize and develop system architecture and strategic business platforms, soaked in storytelling and innovative technology.


Mentions